Showing posts with label Mini Hand Sanitizer. Show all posts

Friday, December 4, 2020

D2BA IG Hop

 Hello stamping friends!

At Dare 2B Artzy we are having a fun holiday hop on Instagram!!

Check out all the details here!!

I just LOVE this time of year!!  Creating fun holiday handmade gifts to add to people's gifts just brings me so much delight. 

I created a candy holder, mini hand sanitizer holder and gift card holder for today's hop!!

Each of these projects feature the awesome new Wavy Slimline Framelit Dies!!  Showing different ways to use the die set, other than slimline cards!

First up is my candy holder:
I featured the adorable gnome image from the Flower Gnome stamp set on this package!!  The 'Happy Holidays' sentiment is from the Reindeer Games stamp set!

Other D2BA Products Used:

-----

Next I have a cute mini hand sanitizer package:
I used the cute Reindeer Games stamp set for the fun image!!  The 'Season's Greetings' sentiment is from the Poinsettia Tangle stamp set!

Other D2BA Products Used:

Here is a side view of the two packages:
So fun!!

-----

Lastly, I have a gift card holder using the Wavy Slimline Framelit Dies set:
The 'Happy Holidays' sentiment is from the Just Chillin' stamp set!

Inside:
How fun!!

I was soooo super excited to find this fun gift card!  I thought of the new Crazy 4 Cocoa stamp set instantly!!

I hope I've inspired you to create some fun holiday projects for friends and family!!

Dare 2B Artzy is giving away two gift certificates and they have a discount code for this weekend!!  

Check out all the details here!!

Have a great day!!


Friday, December 13, 2013

Merry Christmas Sanitizer Holder

Happy Friday Stamping Friends!!

Has the holiday season craziness caught up to you yet?!

It has here!

I've been trying to finish up cards and projects I have been wanting to do!
I'm so glad that I am done working for the season, so it allows me to stay up a little later at night and do whatever I like during the day!

Here's a Hand Sanitizer Holder I created the other night:
I LOVE how it turned out!

Added a mini hand sanitizer in the inside from Bath and Body Works!  Makes for a nicely little added gift to someone special!

I just am in LOVE with the snowflake stamps!
I'm a sucker for snowflake and snowman stamps this time of year!!

The Fancy Snowflakes set from SP & Company is amazing!
I love them!  They stamp so nicely!!
I used the Nameplates Die to create this label on the front!  Such a fun versatile die! 

Check out the snowflake die also from Top Dog Dies that I used:
It's from the Snowflake Trio Die Set!  A must have, in my opinion!!

I added some of Creative Inspirations Paint in Light Purple to the snowflake to make it shimmer! LOVE!

Have a lovely weekend!!


------------------------

Challenges:

SP & Company: Anything Goes
linkingupwithspbutton
Brown Sugar: Christmas
Crafty Catz: Anything Goes
Polkadoodles: Anything Goes
QKR Stampede: 3 Fav. Embellishments (Bling!, Snowflake Die Cut and Crinkle Ribbon)
Stamplorations: Stamps and Silhouettes
SweetPea Stampers: It's Cold Outside
Totally PaperCrafts: Christmas Using Non-Traditional Colors
Wags 'n Whiskers: Christmas

Wednesday, December 11, 2013

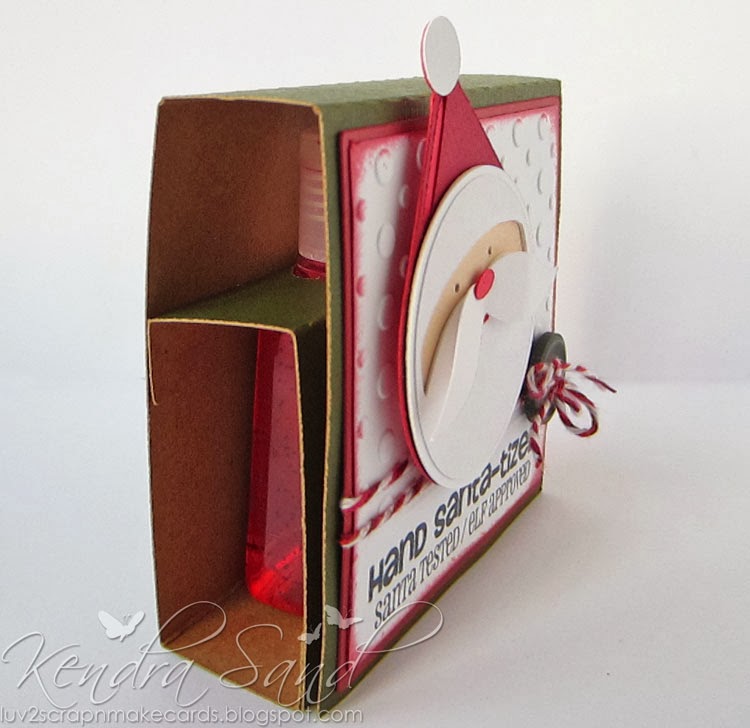
Hand Santa-tizer Packages

Happy Wednesday Stamping Friends!

I'm posting on the Joy's Life DT Blog today!!

This week it is all about 3D Christmas!!
I knew exactly what I wanted to create!!

When I got the Oh, Christmas Puns sets I was so excited to see the "Hand Santa-tizer Santa Tested/Elf Approved" sentiment!

I knew at one point this holiday season I would have to create some of my mini hand sanitizer packages!

Aren't they cute?!?!

A side-view to see the mini hand sanitizer:
I just love these little bottles from Bath and Body Works!

Makes for a nice little gift!

I have some girl friends coming over this week, so I thought it would be fun to create these for them!!


Perfect sentiment for these packages:

Cute Santa from Miss Kate Cuttables!
How fun!!

----------

A look at the stamp set used:


Check out all of Joy's Life Stamps here!


Have a wonderful day!!


--------------------------

Wednesday, November 27, 2013

TDD Treat Bags

Hello Crafty Friends!

As I mentioned Monday I have some fun little quick treat bags to share with you today using some fun Top Dog Dies!!

With the holidays around the corner I love to create little packages to give to people for no reason!

I am hosting the next girl's night, with some of my girlfriends from high school and I thought it would be fun to create some little packages to give them!

Top Dog Dies makes it so easy with their awesome Bag and Box dies, which you can find here!

I recently got the Treat Bag Die!
LOVE it!

I created these 3 packages with it:
They were so simple and fun to make!

They fit a little mini anti-bacterial hand gel from Bath and Body Works perfectly!

Check out the shimmer on the snowflake!! :)

They also fit some candy perfectly as well!!

Close-up of the snowflake:

Now to create a few more, so I have enough for all the girls!

This Treat Bag Die is amazing!!

 --------------


The NEW Top Dog Dies Blog is now live!
Be sure to check it out for all kinds of wonderful inspiration!!

 --------------

Happy Wednesday!!

Wednesday, November 28, 2012

Cute Packages with IBS

It's my turn to do the Whoo Hoo Wednesday Tutorial at Inspired By Stamping!!

I decided to create some cut little packages!

Perfect for little gifts for any holiday!

These cute little packages hold a mini hand sanitizer.
(Which I usually get from Bath & Body Works)


1.       Cut two pieces of cardstock – one at 3” x 10”
and one at 6” x 1 ½”.
As seen in the picture, I cut a few, to make more than one package at once.

2.       Score the large piece at 1”, 2” 5 ½” and 6 ½” along the long side.


3.       Score the small piece along the long side at ½”, 1 ½”, 4 ½”
and 5 ½”.  Turn it and score along the short side at ¼” and 
1 ¼”.  Fold pieces at creased lines.


4.       Trim off each corner tab as shown in picture below


5.       Using the second smallest oval die from the Spellbinders Classic
Ovals Large set, place die in center of large rectangle. 
The die will go over the creased lines slightly. (Picture below)
*You can otherwise use a punch if you’d like.

After you run it through:

6.       Fold the large piece along creased lines to form the holder.


7.       Apply sticky tape on the top, bottom and side tabs.


8.       Peel off the tape covering on the bottom tab and attach to the
inside top of bottom lip of the holder.


9.       Fold in the side tabs and tape them down to the bottom
sides of the holder.


10.   Remove the last piece of the tape covering and
adhere to the back of the holder.


11.   Lastly…..Embellish!!

12.   After you are finished embellishing, add some
Velcro inside on the bottom to help hold the package shut.

Here is a look at a few of the ones I created:

As you can see the middle one, is slightly smaller, but I thought the new December 25th Labels worked nicer with the larger package! 
(But I do have some instructions for the smaller one here, that I created last year.)

An inside look at one of them...
Don't be afraid to dress the inside up with some pretty patterned papers and embellishments!

Close-up views:
The December 25th Labels were so fun to use for these cute packages!!


Added a little color to this one along with some snow!

I used the Festive Frames and Elegant Christmas Sentiments for this one!  It looks speckled because I used a glitter spray to add gold sparkle!

Sets used:


I hope you've enjoyed this fun project, they 
are so fun and simple to make!!

Have a wonderful day!


----------------------

Challenges:
Crazy Amigo Challenge: Gifts
Party Time Tuesday: Anything Goes
Through The Craft Room Door: Anything Goes
Lexi's Creations: Christmas
The Pink Elephant: Pretty Packaging
Addicted to Stamps: Christmas Time
Corrosive Challenge: Anything Goes
Crafty Hazelnut's Christmas: For Someone Special
Little Claire's: Christmas
Anything But a Card Challenge: Always Anything But a Card

Wednesday, October 24, 2012

Halloween Goodies

I sure have been having a TON of fun creating Halloween goodies this year!

First up is a Halloween tag I created using Halloween Labels from Inspired By Stamping!

Such a fun little treat package!

I am also in love with the crinkle ribbon I used from 3 Girl Jam!!  
I used Harvest Orange on this project! 
Found some bone candy that works perfect with this tag!!

I also created some cute little hand sanitizer packages!
 How fun?!?!

For these I used Halloween Tags and Halloween Labels, both from Inspired By Stamping!

Close-ups of two of them:
 Vampire Blood!!

Moon Dust...

These flowers were originally white....but I used Creative Inspirations Paint  in Coal to dye them black and also give them some lovely shimmer!!

Have a wonderful day!!


----------------------------

Challenges:
House That Stamps Built: Anything But a Card
Delightful Challenges: Halloween Treats
Come and Get It Challenges: Halloween
Dream Valley Challenges: Anything Goes
Fashionable Stamping: Halloween
The Craft Place: Halloween
The Squirrel and The Fox: Use Ribbon
Crafty Mess Challenge: Halloween
Di's Digi Design: Too Cute To Spook
Just Some Lines: Any Kind of Halloween Creation
One Stop Craft: Anything Goes
The Poodle Parlour: Anything Goes
Stempelsonnen Challenge: Halloween
The Sisterhood of Crafters: Halloween
My Mums Craft Shop: Spooky
Inky Impressions: Fall/Halloween