Sunday, December 31, 2017

Ornament Boxes


Hello Stamping Friends!

Just wanted to quickly share with you some adorable little boxes I created to put some handmade ornaments in to give as a gift to my mother-in-law at Christmas!

A few years ago I created ornaments for her tree with everyone's name on!  Well this last year we had two new additions to the family!  So I thought I better make an ornament for each of them!
The box, is a .svg file I bought from the Silhouette Design Store, which can be found here!!
I absolutely love how they turned out and her reaction to receiving them was priceless!! 


I hope everyone has a wonderful and safe New Year!! 
Have a lovely day!


------------------------


Saturday, December 23, 2017

Sparkle with Love


Hello Stamping Friends!


I have a cute card to share with you using dies from Frantic Stamper!!

I absolutely love the Layered Tree (10325) die!!
It creates such a beautiful Christmas tree!!  

I absolutely LOVE the sentiment!!  It is part of the Merry and Bright Tree stamp set from Your Next Stamp!!

Be sure to check out all of Frantic Stamper's products here!!

Have a lovely Christmas! 
May they sparkle with love!!


------------------------


Sunday, December 10, 2017

Simple Joys

Hello Stamping Friends!!

I'm on the Dare 2B Artzy Blog today!!

Have you had a chance to see the two new stamp sets released by D2BA?!
(Holly Christmas and Holiday Magic)

They are so fun!!

I decided to work with the Holiday Magic set first!

I was immediately drawn to the branch in the set!  It was screaming 'wreath' to me!!

I started by grabbing a few supplies:

Circle dies are perfect to use for lightly tracing around the outside to give you your wreath shape:
 Even after tracing around the die, I sometimes go back and lightly erase the lines a little to be sure the are light enough, so that you won't even end up seeing them after stamping!!

Now the fun begins!!

Add the branch stamp from the Holiday Magic stamp set to a clear block and begin stamping around the circle you've created:
 I used the Margarita Lime Ink for my stamped branches!

Have fun with this!!

It's okay to over lap the branches when stamping!

Here is a look once I got all the way around:
 How fun!!

I decided to grab a darker green ink and add some more branches on top!!
 I really like the look of the two colors!  Adds some dimension!!

At first I thought about adding some rhinestones to my wreath, but then decided it may be too much.  So I decided some berries would be fun.  Now to either create my own or find a stamp set!  Found the perfect berries!!  I ended up grabbing the Playful Posies stamp set!!  The grouping of three dots, is perfect!!  A total Happy Dance moment!!
After stamping the 'berries' I added Glossy Accents to each of them to give them dimension!  I then sprinkled glitter on the card base while they all were still wet to add some sparkle!!

My finished card:
Both sentiments are from the Holiday Magic stamp set!! 

Close-up:
Aren't the berries yummy!!

I am so in love with this fun and simple design!!


Check out all D2BA's products here!

Thanks for stopping by! 

Be sure to check back for more amazing inspiration!

Have a beautiful day! 

Friday, December 8, 2017

Warm Wishes

Hello Stamping Friends!!

 Dare 2B Atrzy is once again a Super Sponsor for Coffee Lovers Blog Hop!!
With the lovely theme of....Winter!!

When I think of winter, I think of pretty snowflakes and warm drinks!!  So I was so super excited to create this fun shaker card:
I started by grabbing my Perfect Blend stamp set!  I stamped the to-go cup on white cardstock and then did a little masking and used the Snowflake Wishes stamp set to stamp the two smallest snowflakes randomly on the cup!!  

I then masked the 'warm winter wishes' sentiment, also from the Snowflake Wishes stamp set, to only stamp the 'warm' and 'wishes' on the cup!!  I then fussy cut around the to-go cup!!

I created my shaker portion of my card!  I just love shaker cards!!  They are just way to much fun!!

I decided where I was going to put my cup and then decided I would add the vellum stem die cut from the Mug Die (D40) die set!  I love the look it gives!
At first I was only going to add the twine, button and snowflakes, but then thought it would also be fun to add the die cut winter sentiment in silver glitter paper!!

I absolutely love how this card turned out!!


Check out all D2BA's products here!

Thanks for stopping by! 

Have a beautiful day! 

Thursday, December 7, 2017

YNS Challenge #79

Hello Stamping Friends!

Time for a new challenge at Your Next Stamp!!

Click here to find the current challenge!
There is a fun sketch and colors to find inspiration from!!

-----------------

I found some inspiration in some of the colors and followed the sketch just changing it up slightly!!

I love how this non-traditional colored holiday card turned out:
 Isn't she beautiful?!  And so very bright and colorful!! 

I used the snowwoman from the Frosty Friends stamp set!  I colored her with my Copics and then die cut around her using the Circles with Stitching and Piercing Marks Die Set!

The sentiment 'Holiday Joy' is part of the Tweet Love Birds stamp set.  I inked it up with the Black Olive Ink and stamped on the die cut wavy banner from the Cool Tag Three Die Set!!
I added some sparkle to the cuffs of her mittens, brim of her hat and the ball on her hat!!

I finished up my card by adding some Gumdrops!!

-----------------


Be sure to check out all of the lovely products at Your Next Stamp!!
You'll love them!!

Have a lovely day!


-----------------

Tuesday, December 5, 2017

Elegant Christmas


Hello Stamping Friends!


I have an elegant Christmas card to share with you using dies from Frantic Stamper!!

I used the Elegant Merry Christmas (10339) die set for my sentiment:
And I used the lovely Festive Poinsettia (10341) die for my main focal point!

I just LOVE the large poinsettia!!  I added some swirly pearl embellishments behind the poinsettia to add a nice elegant touch!!

I just love elegant Christmas cards like this!! 

Be sure to check out all of Frantic Stamper's products here!!

Have a lovely day!


------------------------


Friday, December 1, 2017

YNS 12 Days Of Christmas – Day 11

Hello Stamping Friends!

Have you seen all the lovely work being posted to the  Your Next Stamp Blog?!?!
All the designers have created a post for the 12 Days Of Christmas series!  Let me tell you, it has been amazing to see all the lovely projects!

Today happens to be my day!

Day 11

I am so excited to share my project with you!

I am absolutely in LOVE with all the lovely Panel Dies YNS released!!

They make some super fun shaker cards!!!

Recently when working with one, I thought it would be fun to alter it a little instead of using the entire panel!  A great way to get a different look and get more uses from the panels!

So I decided to use the Snowflake Panel Die for my tags today!

Depending on what you plan to do, run the entire panel die through your die cutter or just run a portion of it through:
I ran it both ways to show you! I'll create 3 tags with the snowflake panel portions!!

Position the die cut panel in the paper cutter just below the stitched line the runs in the middle.
The stitching marks won't be perfect as the stitching won't run around the corner where you just cut like it does the other actual corner.  But you and I will be the only ones to notice!  Most people probably won't even be able to tell!!

I also trimmed along the stitching on the other three original sides, so there was the same amount of space by the stitching.
The right die cut is with the original sides yet and the left is after I trimmed!  To me it looks perfect!  Can't even tell we altered a die!!

Now the new panel portion is ready to be used to create something fun!

As I mentioned before I thought it would be fun to use them to create some tags for Christmas gifts!!

So I grabbed the fun Bookmark/Tag Die Set!!

I found that the largest die in the set would work for my tag, but the length is a little longer then I need.  So I ended up altering it a little bit.  First ran it through my machine like normal.  Then  grab the snowflake panel, lay it on the bookmark the way you intend to place it.  Making sure to keep the die snug to the two sides slide it to a better length and ran it through the machine again!
I just love being able to alter dies and getting more uses out of them!

Here is a look after it was ran through again:
How cool!!

Now you can assemble your tags as you'd like!!

Here is a look at my three finished tags:
So fun!!  I can't wait to add them to presents!!

 I used the  Stitched Ovals Die Set to die cut an oval to stamp the 'Merry Christmas' sentiment from the Be Jolly stamp set:
I also used the Merry and Bright stamp set to stamp snowflakes on my tag!

I used the adorable reindeer from the Be Jolly stamp set and coordinating Be Jolly Die Set for this fun tag:
I just love the joy of this reindeer!  Sure to put a smile on someone's face!!  The fun 'Holiday Happy Dance' sentiment is also from the Be Jolly stamp set!

For this tag I wanted to just leave it clean and simple to really show off the fun shaker I created:
So pretty!

I hope I've inspired you to create some tags and look at your dies in a different way!  Get as many uses out of them as you can!!

Be sure to check out the  Your Next Stamp Blog and leave some love!  You have a chance at winning some YNS Goodies for yourself!!!  Three YNS Gift Certificates are being given away!!!

-----------------

Be sure to check out all of the lovely products at Your Next Stamp!!
You'll love them!!

Have a lovely day!


-----------------

Christmas is Perfect

Hello Stamping Friends!!

I'm on the Dare 2B Artzy Blog today!!  I have three cards to share with you today!

Two of which I created a few months ago for a call Card Maker Magazine had and they were accepted!!

They are in the Card Maker Winter 2017 Issue pg. 37!!
It's always so much fun to see your work printed!!

Here is a close-up of the two:

They were looking for quick and easy holiday cards!!  I love the simplicity of what I came up with!!

I used a strip of Winter Plaid paper on the right of each card.  And used the gorgeous Poinsettia Tangle stamp set to stamp the poinsettia in colored ink!  The sentiment is from the set as well!  I absolutely love this sentiment!!

Such a fun design to create a bunch of quick holiday cards!!  

Here is one more I created for this post today:
I switched up by flipping the orientation of my layout and using a different sentiment!  I decided to add some pearls to the center of my poinsettia as well!! 

Simple, yet so elegant!!

Check out all D2BA's products here!

Thanks for stopping by! 

Be sure to check back for more amazing inspiration!

Have a beautiful day! 

Friday, November 24, 2017

YNS Challenge #78

Hello Stamping Friends!

Time for a new challenge at Your Next Stamp!!

You can find some inspiration from the sketch and/or colors!!

Sketch:


The Colors:


Click here to find the current challenge!

-----------------

I found some inspiration in some of the colors and followed the sketch!!

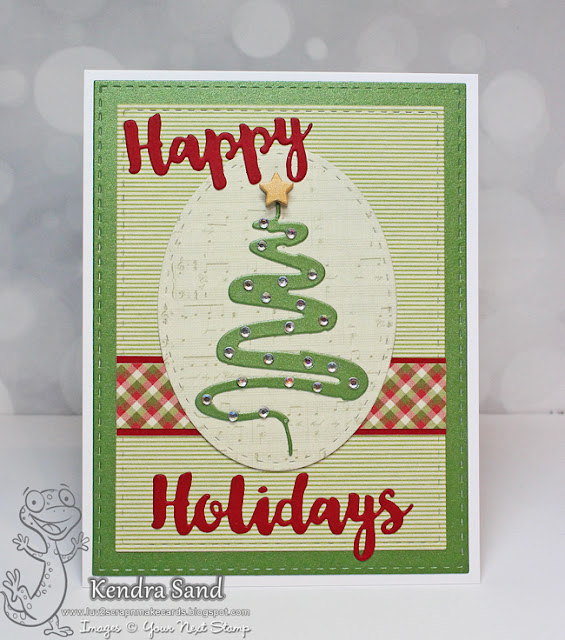
The image and colors made me think of the super fun new Holiday Scribble Tree Die Set!!
I used the set to create both my die cut tree and 'Happy Holidays' sentiment!!  Such a fun die set!

I especially love the gorgeous tree!!  I added a bunch of rhinestones for my ornaments!!!

I also used the Stitched Ovals Die Set and Stitched Rectangle Die Set to create my card layout!!

Happy Black Friday!  
If you went shopping, hope you got what you wanted!  I slept it!!  I'm not a fan of crowds and long lines!!

Hope you had a wonderful Thanksgiving!!  Sorry I didn't have a post yesterday!  I've been a little out of it the last week, struggling with a cold! :(


-----------------


Be sure to check out all of the lovely products at Your Next Stamp!!
You'll love them!!

Have a lovely day!


-----------------

Tuesday, November 21, 2017

Dance


Hello Stamping Friends!


I am sharing my second dance layout with you today that I mentioned I would earlier this month using new dies from Frantic Stamper!!

Again I found some super fun pattern paper to use for my background!!
I ended up leaving the class photo and my daughter's personal photo together with the studio logo and year, as I thought it worked well with my paper I used!!

I added the Ballerina Arabesque silhouette to the left side of my design and decided to add a flower to her dress, to mimic the flower on their girls costumes!!

For my title, I die cut the largest label from the Stitched Double Fishtail Labels die set, using a silver shimmery paper! 
I then die cut the 'Dance' sentiment, which is part of the Dance Rock Sing sentiment die set!  I added some black swirly rhinestones around the label as well as a few flowers like used on the silhouette dancers dress!  

Another fun layout to add to my daughter's album!!

Be sure to check out all of Frantic Stamper's products here!!

Have a lovely day!


------------------------


Friday, November 17, 2017

3D Holiday Blog Hop

Welcome to Dare 2B Artzy's 3D Holiday Blog Hop!!

Can you believe the Holidays are right around the corner once again?!

We at D2BA are so excited!!  We decided to have a fun holiday blog hop featuring 3D projects!!  We hope we inspire you to get artzy this holiday season!!


You should have arrived here from Karen's blog!  
If you haven't and would like to hop along with us, please go back to the Dare 2B Artzy Blog to start at the beginning!

Be sure to follow each blog and leave comments along the way for your chance at winning!  We will randomly choose a winner from one of the blogs, so the more you comment, the more chances you have to win!!

Winner will receive a stamp set and ink pad!!

Blog Hop will end Sunday, November 19th at 7:00pm Central. 

We will then post a winner!!

---------

For my project I used my Cameo to cut out this fun Hanger Treat Envelope I found here as a free download!
I used a piece of Winter Plaid and Red Sweater for my layers on my package!!

I used the gorgeous Poinsettia Tangle stamp set for my poinsettia image!!  I absolutely LOVE this stamp set!!  All the detail is just so amazing!!  I decided to stamp the poinsettia on vellum and emboss with white embossing powder!!
I also used the new coordinating Poinsettia Die!!  I love not having to fussy cute the image!!  Plus the set includes a die to cut out part of the middle section, so you can layer the poinsettia like I did!!  Makes it so fun and simple!  LOVE it!!

For my sentiment, I used the new Merry Christmas Layer Die!
I love this die set!  So many fun options!!  

I ended up putting some yummy Andes candies in my package, but a gift card would be an awesome idea as well!  Or candy and a gift card!!

Perfect for the Holidays!!


---------

Thanks for stopping by! 

Your next stop in the hop is Tasha's blog! 

We hope you are inspired all along the way! 

Check out all D2BA's products here!

Happy Hopping!


Tuesday, November 14, 2017

YNS November DT Dare

Hello Stamping Friends!

It's DT Dare day at Your Next Stamp!!

DT Dare is....
Favorite Christmas Color Combo

What a fun dare!! 

I would have to say my favorite Christmas color combo would be Purple and Turquoise!!

With that in mind, I created this fun shaker card:
I used the Stitched Square Frame Die Set  to create my shaker!!

Along with the new Merry Die and Merry Everything stamp set, for my sentiment!!
So fun!!

I just LOVE this time of year!!

Usually with my husband gone this coming weekend, the kids and I begin decorating, but this past weekend we couldn't contain ourselves anymore and started!!  It is our first Christmas in our new house and we host two family holiday parties this year, so we are going a little all out!!

One of our Christmas trees actually has this color combo!  Plus the addition of pink!!

Can't wait!!


Be sure to check out the other DT projects on the YNS Blog and leave a comment for your chance at winning a stamp set of your choice!!

Be sure to check out all of the lovely products at Your Next Stamp!!
You'll love them!!

Have a lovely day!